Window Light Has a Direction: Follow It Before You Frame
Window light direction can shape a quiet scene without extra equipment. Learn a simple morning routine for reading brightness, softness and shadows.
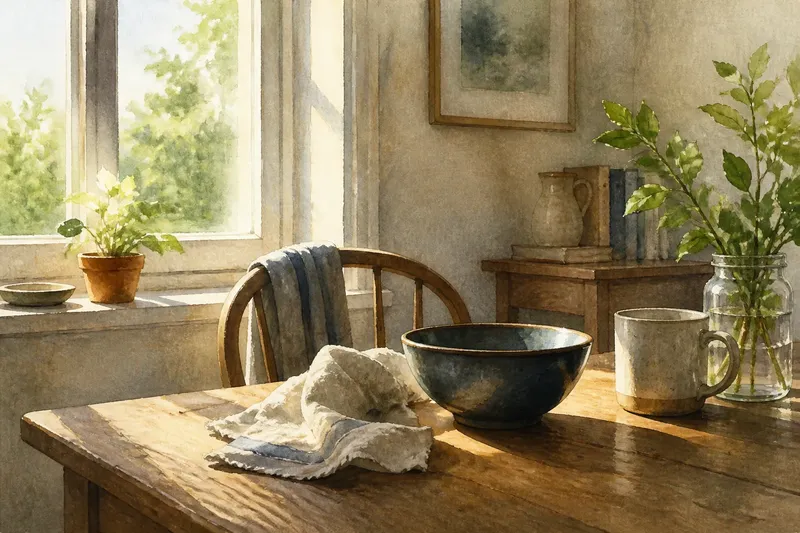
Where is the window light coming from, and what changes if you move the subject before lifting the camera? Window light direction is often the first choice that shapes an indoor photograph: it determines which surfaces brighten, where shadows fall and how clearly a subject stands apart. A simple morning routine can help you notice those effects and use them without adding equipment.
The aim is not to find one perfect arrangement and repeat it. Instead, take a few moments to read the light, shift the subject, then make a small change in your viewpoint. Treat the room as it is, rather than trying to make every scene resemble a studio.
Start by reading the window light
Before composing, pause where you can see both the window and the subject. Notice whether the window is to the subject’s side, behind it, or in front of it from your position. Those relationships matter more than the window’s size alone: a broad window can still produce a distinct direction if its light reaches the subject from one side.
Look at the shadows on the subject and nearby surfaces. A shadow with a clear edge suggests more directional light; a softer edge suggests light spread across the room or softened by cloud, curtains or other surroundings. Neither is automatically better. A defined shadow can make the shape of a mug or plant easier to read, while softer light may suit a face or pale fabric.
Also check how far the subject sits from the window. Light tends to feel more concentrated near its source and more mixed with the room’s ambient brightness farther away. A table close to the glass may show a noticeable bright side and a dimmer side; a table deeper in the room may have gentler differences but less separation from its background.
Use a morning routine to follow changing light
Choose a scene that can stay in place for a short while: a cup on a table, a bowl of fruit, or a folded cloth beside a chair. Keep the camera settings and lens choice simple enough that your attention stays on the light. You do not need to make a picture at every stage; looking carefully is part of the practice.
- When you first settle in: Note the window’s position relative to the subject. Look for the brightest face, the darkest shadow and any reflection on glass, glazed pottery or polished wood.
- After the room has settled: Check whether the shadow edges are crisp or gradual. Notice whether direct sunlight is crossing the scene or whether the light is mostly diffuse.
- Before changing the subject: Take one frame from your current position. This gives you a reference for the direction of the light, not a verdict on the composition.
- As the light shifts: Recheck the subject’s bright side and shadow. If sunlight moves across the table, decide whether that changing patch helps the scene or distracts from it.
- Before you finish: Return to the scene after a pause and look again. Compare the shadows and reflections, then choose the arrangement that expresses the quality of light you prefer.
This routine is flexible rather than tied to a particular hour. A north-facing window may give a different impression from an east-facing one, and cloud can soften a scene that looked more contrasty moments earlier. Follow what is visible in your room instead of assuming that “morning light” always behaves in the same way.
Move the subject before changing the camera
Small adjustments to the subject can alter how the light describes it. Turn a cup so its handle catches a side highlight, or rotate a piece of fruit until the brighter area leads towards its form. With a person, a modest turn of the shoulders can change whether the light reaches both cheeks or leaves one side in shadow.
Then try moving the subject nearer to or farther from the window. Bringing it closer may make the difference between its lit and shadowed sides more apparent. Moving it back can make the light less dominant, though the room’s background brightness and the subject’s separation from it will also affect the result.
Watch what happens to the background as well as the subject. A book placed near a window might cast a long shadow across a blank wall; moved slightly, it may sit against a brighter patch instead. The shift can be as modest as moving a chair or turning a vase, yet it changes the visual relationship between light, object and setting.
Make one small viewpoint shift
Once the subject is where you want it, move your own position a little rather than immediately changing lenses or reaching for accessories. Step to one side, crouch slightly, or raise the camera enough to alter what lies behind the subject. The light has not changed, but its effect in the frame may become clearer.
From one angle, a shadow may overlap the subject’s outline and make its shape hard to read. A small move can separate the shadow from the object or place a bright background behind a darker edge. Think of it like turning a book under a reading lamp: the lamp stays put, but the page’s highlights and shade shift as its angle changes.
Keep the movement small enough to compare the results. If every part of the scene changes at once, it becomes difficult to tell what helped. Make one adjustment, look at the frame, and decide whether the subject’s shape, shadow or background now supports the photograph more effectively.
Choose the light that suits the scene
Strong contrast can give a still life a clear sense of form, but it may also hide detail in the shadowed side. Soft light can preserve a quiet, even appearance, yet pale objects against a pale wall may lose definition. Decide which quality matters for the scene rather than treating contrast as a problem to solve.
Say you have placed a dark ceramic bowl beside a window on a cloudy morning. The first frame shows a faint highlight on the rim, but the bowl blends into a dark corner behind it. You move the bowl closer to the window, then shift your viewpoint until a lighter part of the wall sits behind its edge; you would expect the rim and silhouette to become easier to distinguish, while the scene still uses only the available light.
Reflections deserve the same attention as shadows. A window can appear as a bright shape in a framed print, a phone screen or a glossy tabletop. A slight turn of the object or camera may move that reflection out of the most distracting place, although a reflection can also be a useful sign of the window’s direction.
What should you check before taking the frame?
How can you tell which way window light is coming from?
Look for the brightest side of the subject and the direction in which its shadow falls. Compare both with the window’s position; together, they reveal the light’s path more reliably than brightness alone.
What makes window light look soft?
Soft light usually creates gradual transitions between bright and shaded areas rather than sharply outlined shadows. Cloud, distance from the window and light spread around the room can all contribute to that appearance.
Should the subject face the window?
Facing the window can brighten the front of a subject, while turning it partly sideways can reveal more shape through light and shade. Choose the orientation that suits the detail you want the viewer to notice.
Can you improve a window-light photograph without equipment?
Yes: adjust the subject’s position, turn it slightly, or shift your viewpoint to change the background and shadow relationships. Where a choice depends on a camera label or manufacturer’s instructions, follow those directions; otherwise, keep the adjustments observational and simple.
Finish by noticing what the light leaves behind
Before moving on, check the frame for bright patches that pull attention away, shadow edges that merge with the subject, and reflections that change its character. Then decide whether those details belong in the picture. A photograph need not make every part equally clear; it should make its chosen relationship between subject and light legible.
Window light direction becomes easier to recognise when you return to ordinary scenes and look before framing. A cup, a chair or a patch of fabric can show you how the room’s light behaves, while a small shift in position lets you respond without rearranging the whole space. Keep the best frame as a reminder of what you noticed, and the next window will offer a fresh set of shadows to read.